(Guest post by Dave Crowder, Eshop Guide’s CTO)
This article covers the steps required to achieve an automated Shopify file import process through the use of Ruby, Heroku, and SFTP To Go.
Everyone can benefit from an easy-to-use file synchronization process, even online retailers! However, there are still some things that are better left solely for us programmers.
These days, many businesses selling products directly to consumers, are using Shopify as a storefront. Key Shopify stats for 2023 include:
- More than 4 million merchants are now using Shopify.
- Subscription Solutions revenue rose by 11% due to more merchants joining the platform, this includes an increase in Shopify app usage.
- Monthly Recurring Revenue (MRR) increased by 10% driven by more merchants converting to full-priced Standard subscription plans.

For quick run-through of these and other jaw-dropping stats, watch the PopupSmart video below.
Beyond the "Buy" button
Shopify is popular because it's easy to use, looks desirable, and pretty much takes care of the management A to Z for you. This includes everything from inventory and stock management to managing orders and most importantly: processing payments.
Parallel to this, it is encouraged to utilize Shopify apps and integrate external platforms with your store to really help it stand out and gain traffic.
To provide customers with more than a simple buy button, Shopify offers ways to master the learning curve and keep up with new concepts and technical skills to make your brand representable through your store from start to finish.
You have the opportunity to augment your products through additional information in the form of images, specs, manuals, and visual cues for product features.
Within the Shopify world, the best place to store such documents is in the store files (or sign in and view them through the Shopify admin).
For an in-depth video guide to the Shopify Settings dashboard, including the Files section, watch the video below by Matthew Lester Website Design.
They are easily accessible from the shop theme via Shopify’s templating language Liquid and benefit from the speed and reliability of Shopify’s global CDN.
Up until the June 2021 Update of the Shopify API, the management of the store's files was a tedious, manual task. Since then, store files gained the ability to be created programmatically by using the GraphQL API, which still poses its own constraints that I will be addressing later on.
What we wanted to achieve
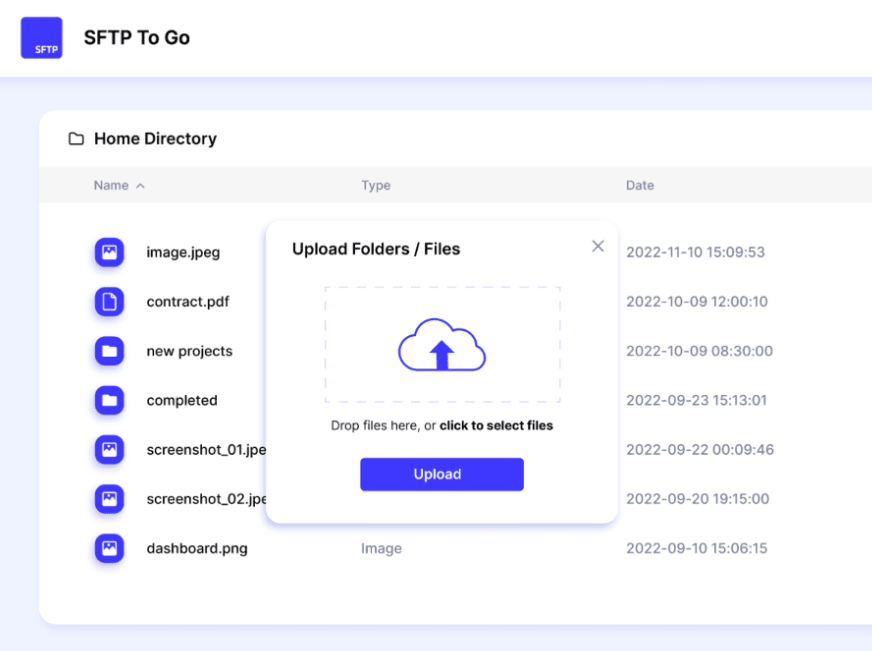
Our customers, the shop owners, needed an easy-to-sync option or simple file uploading added to their Shopify store.
There is no doubt that Shopify’s GraphQL provides these options, but the platform was constructed for developers, meaning it isn’t as friendly for end users or IT folks.
FTP, on the other hand, is a protocol that has been around for ages and is known to be in the toolbelt of the majority of IT administrators, consisting of processes such as automating tasks and pushing files around to and from FTP Servers.
On that note, we set out to provide them with a convenient way to export icons, images, user manuals, etc. from their PIM (Product Information Management system), etc, while having them accessible from their Shopify store.
Why we chose SFTP To Go
Since writing my first Rails application back in 2015, I find that Heroku has been the simplest way through which to deploy code into a production environment while having to think very little about infrastructure so I can focus more on what really matters to me: providing value through code.
Heroku is also easily extendable through service add-ons such as SFTP To Go, instead of setting up an FTP instance and having to worry about monitoring its state, storage, or even adding the FTP URL to the app's environment variables.
With just a few clicks, I can add an FTP Server to my application that is fully managed and ready to go!
So, how do my files get into Shopify?
Shopify offers two paths for uploading files using the Files API, both are a two-step process really. The one we didn’t use in this example requires you to create a stagedUpload Target and then upload your files to that URL.

The other approach is a bit simpler, in that you specify an originalSource (an external, public URL) and Shopify then takes care of fetching those files from that URL.

This way you don’t have to take care of the uploading process at all, but it requires a web server in order to serve those files that were previously put on the FTP server.
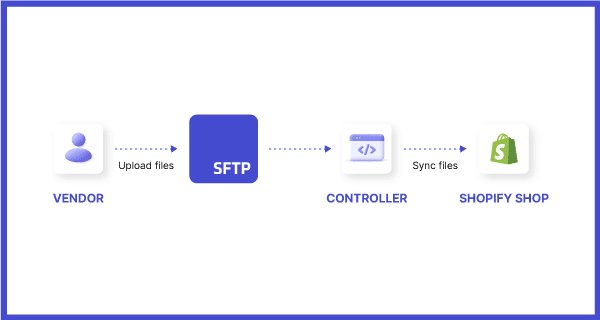
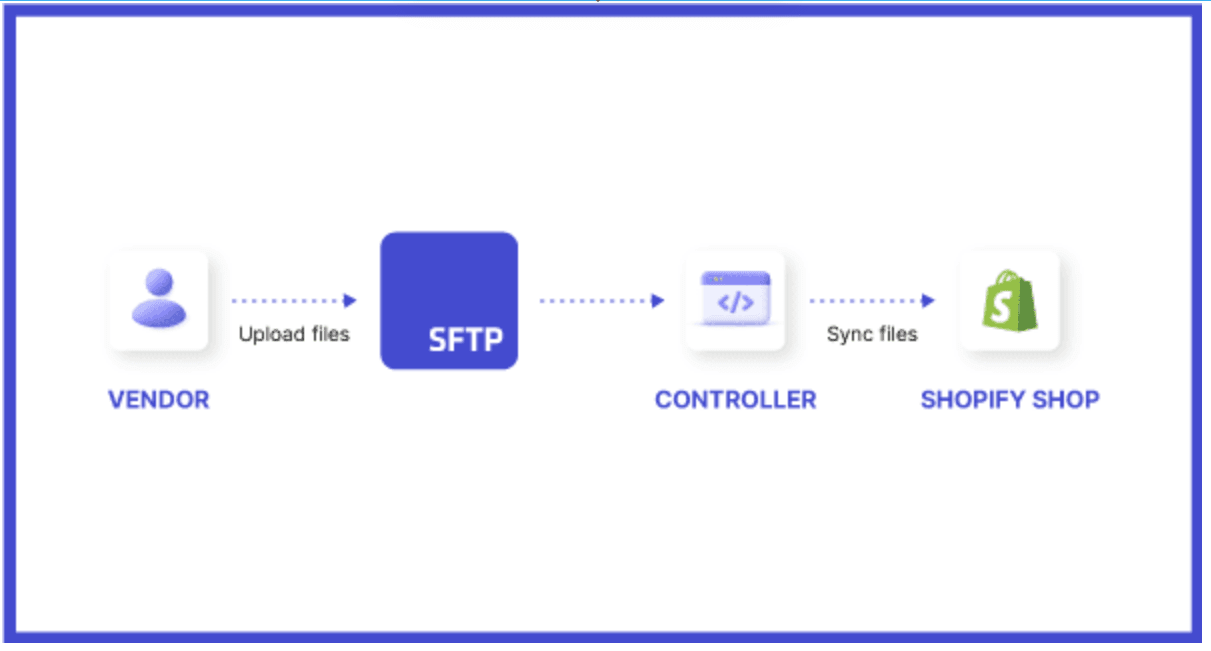
Lucky for us, SFTP To Go also supports publicly served files from a special folder called /public (who would have thought, right? :D) which I learned about through their support pages. This was really the missing piece of the puzzle that further led us to a process that can be roughly described as follows.
Now, it’s time to dive into the code!
FileOrganizerService
This one, as the name suggests, pulls all the strings together. It is also the entry point for the file import process that gets called from a rake task, scheduled to run once a day or on any other schedule specified using another Heroku add-on called Cron To Go.
First, it obtains a list of the already existing files in the Shopify Store in order to avoid uploading duplicates. Then, it calls the SftpFileLoaderService to load all of the filenames from a specified folder on the FTP Server.
Finally, these filenames are used to create new file entries in Shopify using the FileOrganizerService.
module FileServices
 ## reads existing filenames from Shopify to avoid duplicates
 # then starts reading filenames from FTP and creates new file entries in Shopify
 class FileOrganizerService < ApplicationService
   attr_reader :shop

   def initialize(shop)
     @shop = shop
   end

   def call
     # get an array of the existing filenames in the Shopify store to avoid duplicate uploads
     existing_filenames = query_existing_files
     # get all filenames that are not yet existing in the shopify files
     file_names = FileServices::SftpFileLoaderService.new(ENV.fetch('SFTPTOGO_URL'), existing_filenames).call
     file_names.each do |file_name|
       # Create a new file entry
       FileServices::FileImporterService.new(shop).call(file_name)
     rescue StandardError => e
       # report any errors to everyone's favourite error tracker
       Honeybadger.notify("ERROR Uploading #{file_name}: #{e.message}")
     end
   end

   private

   def query_existing_files
     existing_filenames = []
     shop.with_shopify_session do
       file_result = ShopifyAPI::GraphQL.client.query(file_search_query)
       existing_filenames << query_result_to_array(file_result&.data&.files&.edges)
       # if more than one page
       while file_result&.data&.files&.page_info&.has_next_page
         cursor = file_result&.data&.files&.edges&.last&.cursor
         file_result = ShopifyAPI::GraphQL.client.query(file_search_query, variables: { cursor: cursor })
         existing_filenames << query_result_to_array(file_result&.data&.files&.edges)
       end
     end
     existing_filenames.flatten
   end

   def file_search_query
     ShopifyAPI::GraphQL.client.parse <<-'GRAPHQL'
       query ($cursor: String){
         files(first:250, after: $cursor){
           pageInfo {
                 hasNextPage
               }
           edges{
             cursor
             node{... on GenericFile {
                 url
                 id
             }}
             node{... on MediaImage {
                 id
             }}
           }
         }
       }
     GRAPHQL
   end

   private
   def query_result_to_array(edges)
     return unless edges.present?

     edges.map do |edge|
       if edge&.node&.__typename == 'GenericFile'
         File.basename(URI.parse(edge&.node&.url).path) if edge&.node&.url.present?
       else
         edge&.node&.id
       end
     end
   end


 end
end
SftpFileLoaderService
This service handles the connection to the SFTP Server. Once you’ve installed SFTP To Go in your Heroku application, an environment variable named SFTPTOGO_URL will be automatically created. This URL is then used to call this service: ENV.fetch('SFTPTOGO_URL')
Another ENV variable FTP_FILE_DIR specifies the directory to look for new files. In our case, it is a subfolder of the public folder, that is available via HTTPS (this makes a difference later in the process when Shopify is picking up those files).
In the end, this process returns a list of filenames (in a specified directory) that are not already existing in Shopify.
module FileServices
 class SftpFileLoaderService < ApplicationService
   attr_reader :sftp_uri, :filename, :existing_filenames

   def initialize(sftp_uri, existing_filenames)
     @sftp_uri = URI(sftp_uri)
     @existing_filenames = existing_filenames
   end

   def call
     load_files
   end

   private

   def sftp
     # establish connection to SFTP Server
     @sftp ||= Net::SFTP.start(@sftp_uri.host, @sftp_uri.user, password: @sftp_uri.password)
   end

   # fetches all filenames from the configured directory, that are not in the existing_filenames list
   def load_files
     file_names = []
     dir = ENV.fetch('FTP_FILE_DIR')
     sftp.dir.foreach(dir) do |entry|
       # skip if file already exists on server
       next if existing_filenames.include? entry.name
       file_names << entry.name
     rescue Net::SFTP::StatusException => e
       Rails.logger.error "Error while downloading data: #{e.description}"
     end
     file_names
   end
 end
end
FileImporterService
This process is used for each of those filenames returned before we run the FileImporterService.
One important note to remember here is the ‘full_url’, which gets filled with the SFTPTOGO_PUBLIC_URL ENV variable in addition to the ‘URL-Escaped’ filename. This way, the file is accessible publicly and can be downloaded by Shopify. The rest speaks for itself, I hope.
module FileServices
 class FileImporterService < ApplicationService
   attr_reader :shop

   class FileCreateError < StandardError
   end

   def initialize(shop)
     @shop = shop
   end

   def call(file_name)
     shop.with_shopify_session do
       execute_query(file_name)
     end
     true
   end

   private

   def execute_query(file_name)
     full_url = "#{ENV.fetch('SFTPTOGO_PUBLIC_URL')}#{ERB::Util.url_encode(file_name)}"
     Rails.logger.info "Creating #{file_name}"
     result = ShopifyAPI::GraphQL.client.query(file_create_query, variables: {
                                                 "files": {
                                                   "originalSource": full_url
                                                 }
                                               })
     error = result&.errors&.details || result.to_h['data']['fileCreate']['userErrors'].first

     raise FileCreateError, error['message'] if error.present?
   end

   def file_create_query
     ShopifyAPI::GraphQL.client.parse <<-'GRAPHQL'
     mutation ($files: [FileCreateInput!]!) {
       fileCreate(files: $files) {
         files {
           fileStatus
         }
         userErrors {
           field
           message
         }
       }
     }
     GRAPHQL
   end
 end
End
There we have it: An easy process used to import files into a Shopify store. All that is required from the merchant is to put files into an FTP directory and sit back.
Of course, this could be extended to a fully-fledged synchronization mechanism— SFTP To Go offers webhook notifications so that instead of using a scheduler, we could sync a file as soon as it’s uploaded, or remove it from Shopify.
About the author

Dave is a founding member and CTO of Eshop Guide, a German-based agency that provides projects and services relating to Shopify for a range of clients, from small startups to big companies.
Eshop Guide is also active within the Shopify public app space, having developed multiple integration apps for German accounting systems (lexoffice, sevDesk) and price comparison portals (idealo).
As a progressive company, Eshop Guide pride themselves on having a different perspective on what working as an agency means.

They believe that reducing stress for the employees while focusing on physical and psychological well-being as a part of a regular workday ultimately increases productivity overall.
Dave is also a big fan of raising human awareness through meditation, an integral part of his daily routine, which is reflected in Eshop Guide’s work environment.
Frequently asked questions
Why do online retailers benefit from file synchronization on Shopify?
Online retailers benefit from file synchronization as it facilitates the efficient management of product information, images, manuals, and features, enhancing the overall shopping experience and brand representation on Shopify.
How has Shopify evolved in 2023?
By 2023, Shopify has witnessed significant growth, with over 4 million merchants using the platform. The platform has seen an 11% increase in Subscription Solutions revenue and a 10% rise in Monthly Recurring Revenue (MRR), indicating more merchants are adopting Shopify and utilizing its apps.
What makes Shopify a preferred choice for businesses?
Shopify is preferred for its user-friendly interface, comprehensive management features including inventory and order processing, and the ability to integrate external platforms and apps to enhance store functionality and traffic.
How has the management of store files on Shopify improved?
Since the June 2021 Update of the Shopify API, store files can now be created programmatically using the GraphQL API, streamlining the management process that was previously manual and tedious.
Why was SFTP To Go chosen for file import?
SFTP To Go was chosen for its seamless integration with Heroku, ease of deployment, and fully managed FTP Server, allowing developers to focus on coding while ensuring the efficient transfer of files.
How does SFTP To Go facilitate file import into Shopify?
SFTP To Go supports publicly served files from a special folder, enabling Shopify to fetch these files easily. Combined with services like FileOrganizerService, SftpFileLoaderService, and FileImporterService, it automates the file import process efficiently.
Can the file import process be further optimized?
Yes, the process can be extended to a full-fledged synchronization mechanism. SFTP To Go offers webhook notifications, enabling real-time file sync or removal from Shopify as soon as it’s uploaded.
What is Eshop Guide’s approach to work environment and employee wellbeing?
Eshop Guide focuses on reducing stress for employees and prioritizes physical and psychological wellbeing as part of a regular workday, believing that this approach ultimately increases overall productivity.