

What this SFTP to SharePoint guide covers
This guide focuses on one job: copying new files from SFTP To Go into SharePoint with Power Automate. Before you build it, use How to Connect Power Automate to SFTP to create and test the shared SFTP-SSH connection. If you need files to move from SharePoint to SFTP To Go instead, use SharePoint to SFTP Sync.
When a partner, customer, vendor, or external system uploads a file to the selected SFTP To Go folder, a webhook starts the flow. Power Automate reads the uploaded path, retrieves the file, and creates it in a defined SharePoint document-library folder for internal review, storage, or processing.
This walkthrough copies files created in the selected SFTP To Go folder. Backfills, renames, deletions, and continuous two-way synchronization require additional flow logic and aren’t covered here.
How the SFTP to SharePoint flow works
The inbound workflow has five stages:
- SFTP To Go sends a
file.createdwebhook when a new file reaches the watched folder. - Power Automate receives the HTTP request and reads the event payload.
- A folder condition confirms that the uploaded path belongs to
/inbound. - The
SFTP-SSHconnector retrieves the file body from SFTP To Go. - SharePoint
Create filewrites the original file name and content to/Shared Documents/FromSFTP.
This pattern is especially useful when external senders already use SFTP while your internal team works in SharePoint. Common examples include:
- Receiving vendor invoices, reports, or scheduled exports in SharePoint
- Routing partner or customer uploads into a document library for review
- Copying healthcare, finance, education, or operations files into the team workspace
- Moving system-generated files from an SFTP drop folder into SharePoint-based processes
Keeping SFTP as the external delivery channel while SharePoint remains the internal working environment.
In the tested setup, each uploaded file started a separate Power Automate run. That makes it easier to match each run to its file when several uploads arrive close together.
Preparation and setup
Before you open the flow designer, confirm the Power Automate connections, source folder, destination folder, permissions, and test conditions for this inbound process.
Confirm the Power Automate connections to SFTP To Go and SharePoint
Complete the shared SFTP connection setup in How to Connect Power Automate to SFTP before you build this flow. The connection test should list the folders available to the SFTP To Go credential that will read files from /inbound.
Confirm the SharePoint connection
Make sure Power Automate is connected to SharePoint with an account that can create files in the required site, document library, and destination folder.
In Power Automate:
- Open
Data. - Select
Connections. - Select
New connection. - Choose
SharePoint. - Sign in with the Microsoft account that has access to the SharePoint destination used in the flow.
When you add SharePoint Create file, confirm that you can select the correct Site Address and Folder Path. If either option is missing, check the account’s SharePoint permissions or repair the connection before continuing.
Once both connections work, you’re ready to prepare the folders and build the SFTP-to-SharePoint flow.
Prepare the SFTP source and SharePoint destination
Prepare the following:
- Permission to the SharePoint site, document library, and destination folder
- Power Automate access with the Request trigger and the
SFTP-SSHand SharePoint connectors available - The tested
SFTP-SSHconnection from How to Connect Power Automate to SFTP, using an SFTP To Go credential that can read the source folder - A working SharePoint connection that can create files in the selected destination
- A dedicated SFTP To Go source folder, such as
/inbound - A dedicated SharePoint destination, such as
/Shared Documents/FromSFTP - Test files with the names, sizes, and arrival volumes expected in normal use
- An agreed response for duplicate names, failed runs, retries, and exception review
Keep the route specific: external senders upload to /inbound, and the flow creates the corresponding files in /Shared Documents/FromSFTP.
Confirm that the SFTP To Go credential can read /inbound and that the SharePoint connection can create files in the destination folder. The webhook payload contains the full path to the uploaded file, so this walkthrough uses an SFTP To Go credential whose home directory is set to the storage root. This allows Power Automate to use the path returned by the webhook directly. Check those permissions first, so you don’t spend time troubleshooting the flow when the real problem is access.
Point the webhook at a dedicated source folder rather than the credential’s entire visible root, and write to a specific SharePoint destination. This keeps unrelated uploads out of the flow and makes each run easier to match to its file.
Because the generated HTTP URL can start the flow, treat it like a secret. Don’t publish it, paste it into public documentation, or reuse it outside this workflow.
Before production use, review request validation and webhook security in the SFTP To Go webhook documentation and Microsoft guidance for HTTP request triggers.
Build the SFTP to SharePoint flow in Power Automate
Step 1: Create the SFTP to SharePoint webhook flow
First, create the flow that’ll receive the HTTP POST request from SFTP To Go.
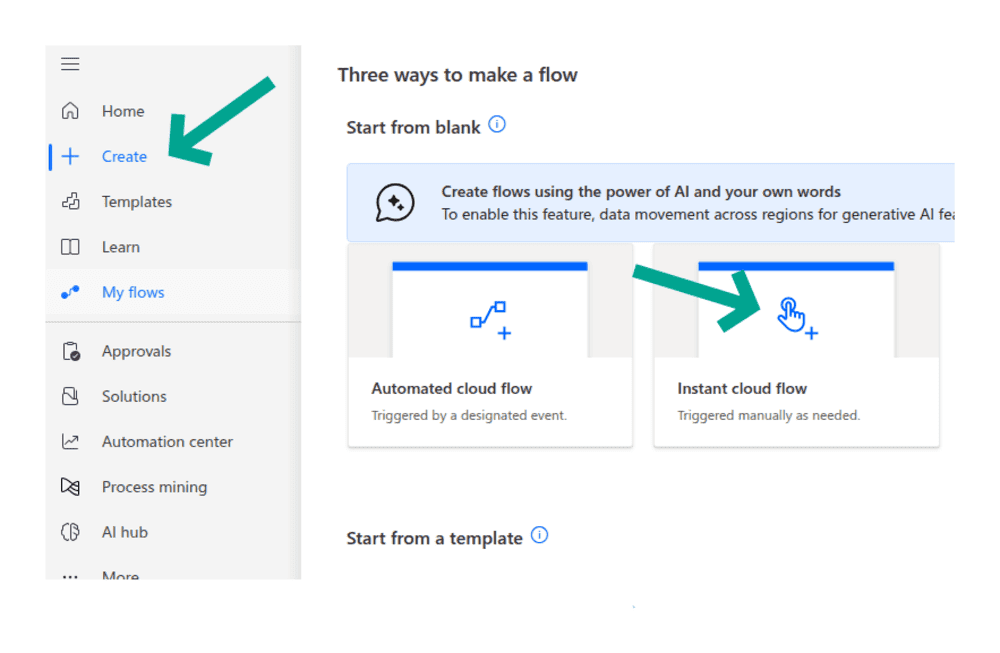
- In Power Automate, select
Create. - Select
Instant cloud flow.
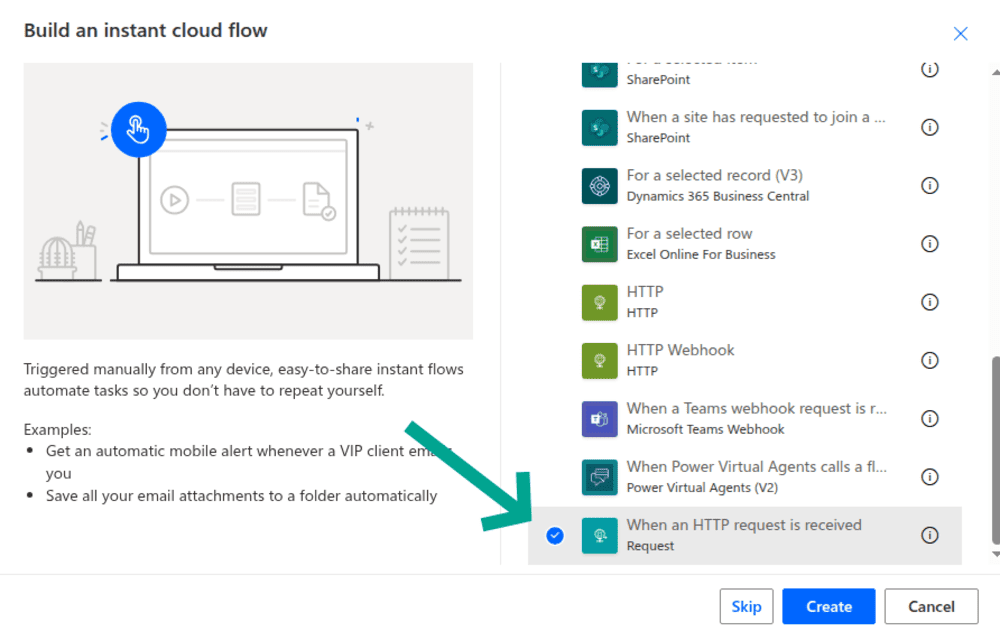
- Choose
When an HTTP request is received.
- Name the flow
SFTP To Go to SharePoint. - Select
Create. - For the direct webhook setup used here, set
Who can trigger the flow?toAnyone, so SFTP To Go can send the request without Microsoft Entra credentials. - That means anyone with the URL can start the flow, so keep the endpoint private and follow your organization’s security policy. If anonymous HTTP triggers aren’t allowed, use an approved authenticated relay or another endpoint design instead.
- Save the flow once.
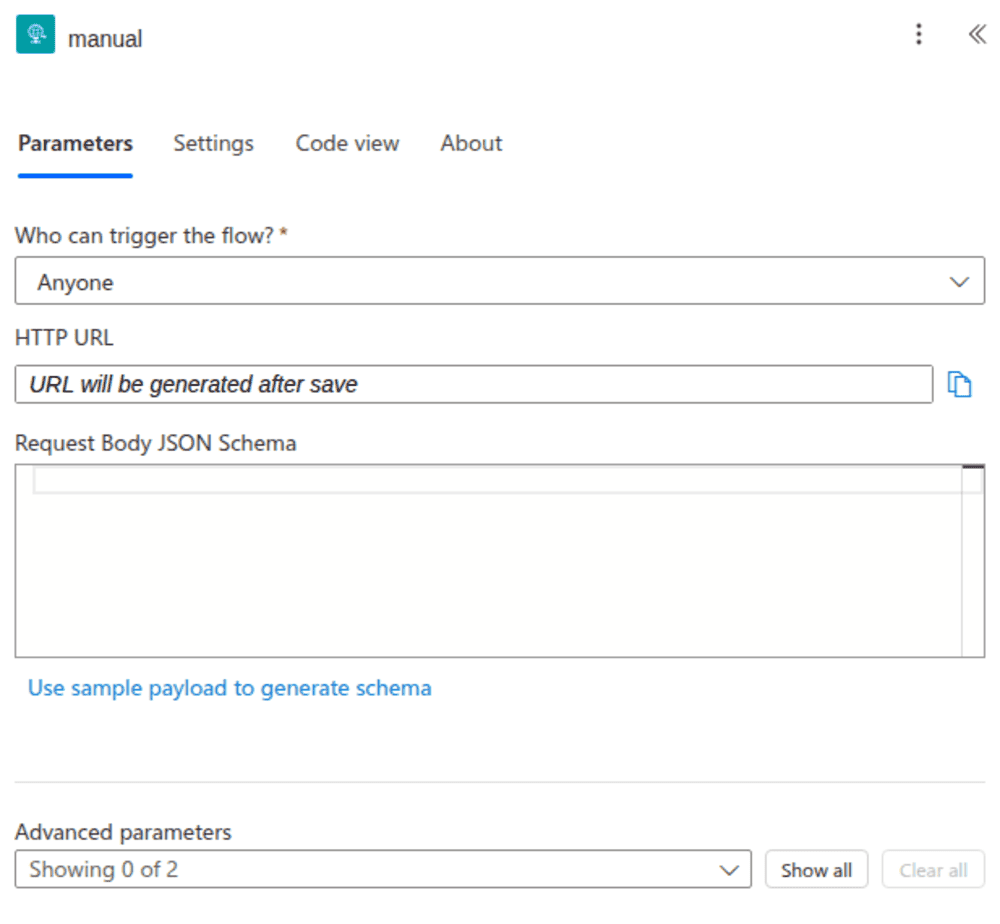
- Copy the
HTTP URLfrom the trigger card after it appears.
Power Automate doesn’t generate the endpoint until you save the flow for the first time. SFTP To Go will send each matching webhook notification to this URL, so copy it exactly and keep it private.
The flow can now receive a request, but it can’t move a file yet. You still need to add the payload schema, folder check, SFTP file path, and SharePoint file-creation action.
Step 2: Connect the SFTP To Go webhook to Power Automate
Now configure SFTP To Go to send file-created notifications to the Power Automate endpoint.
- Open the SFTP To Go dashboard.
- Go to
Webhooks. - Add a new webhook.
- Give it a descriptive name, such as
SFTP To Go to SharePoint.
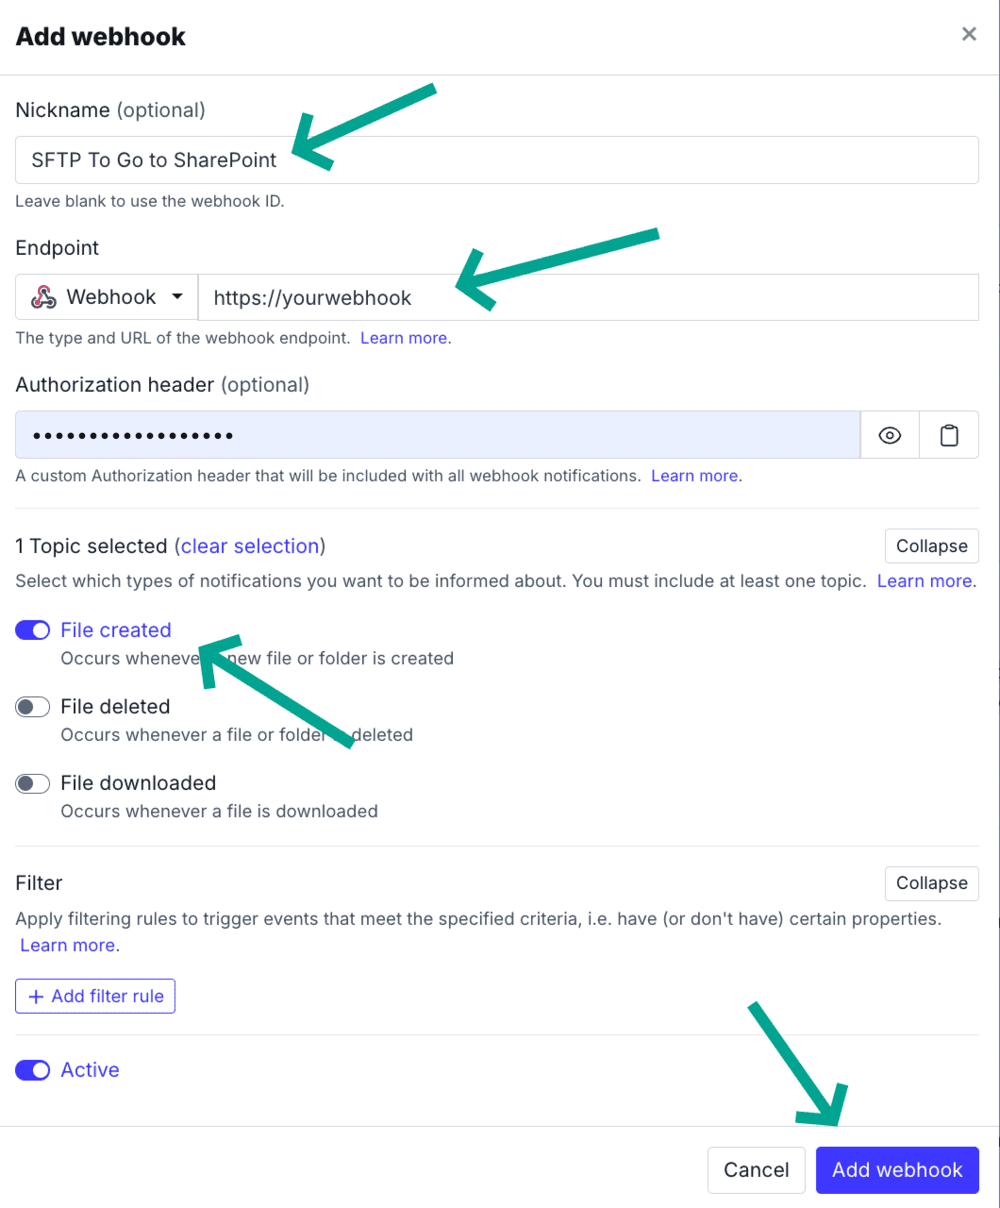
- Paste the Power Automate
HTTP URLinto the endpoint field. - Select the file-created event (
file.created). - Use webhook filters where possible. Limit the path to the credential’s inbound folder (for example,
Path starts with home/<username>/inbound/) and usePath matches ^.*[^/]$to send file events rather than directory-creation events. - Save the webhook.
- Upload one small test file to
/inbound.
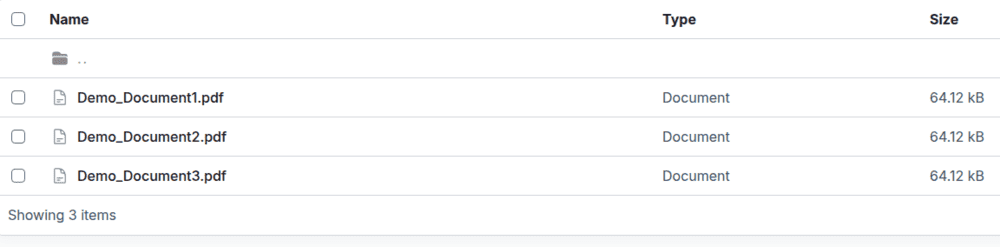
Upload one small test file to /inbound, then open the run it starts in Power Automate. The Request trigger can receive the webhook before you add a JSON schema, but the schema is needed to expose fields such as Topic and Data.Path for use in later actions.
The Path starts with filter keeps events outside the selected /inbound folder from reaching this flow. If you don’t apply a path filter in SFTP To Go, you can add a Power Automate Condition later to check Data.Path before retrieving the file.
Step 3: Generate the Power Automate request schema
The JSON schema lets Power Automate turn fields in the webhook body into values you can use in conditions and later actions.
- Upload a test file to the watched SFTP To Go folder.
- Open the triggered run in Power Automate.
A failure here is normal. The trigger has received the request, but it can’t expose fields such as Topic and Data.Path until you add the schema.
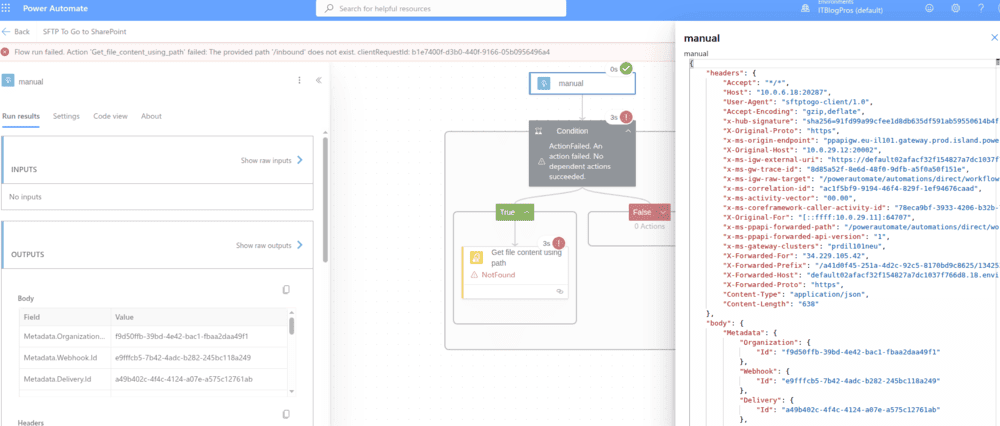
- Open the run history.
- Copy the trigger body
JSONfrom the output field. - Return to the HTTP trigger card.
- Select
Use sample payload to generate schema. - Paste the trigger body
JSON. - Select
Save.
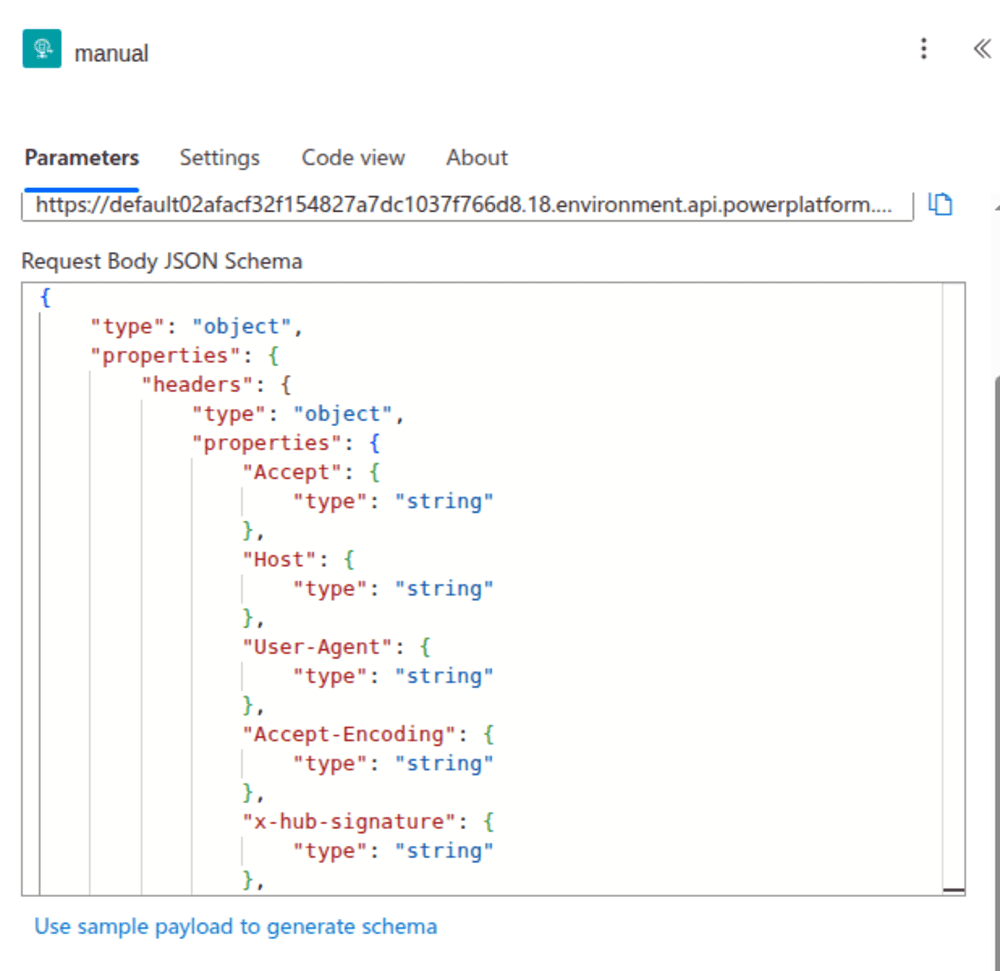
The uploaded file path is nested under Data, then Path.
In the tested payload, the path begins with:
home/Graeme/inbound/
Power Automate uses this value to identify the exact SFTP file in the retrieval step. Check the prefix and folder in your own payload instead of assuming they’ll match the example.
Step 4: Retrieve the uploaded SFTP file
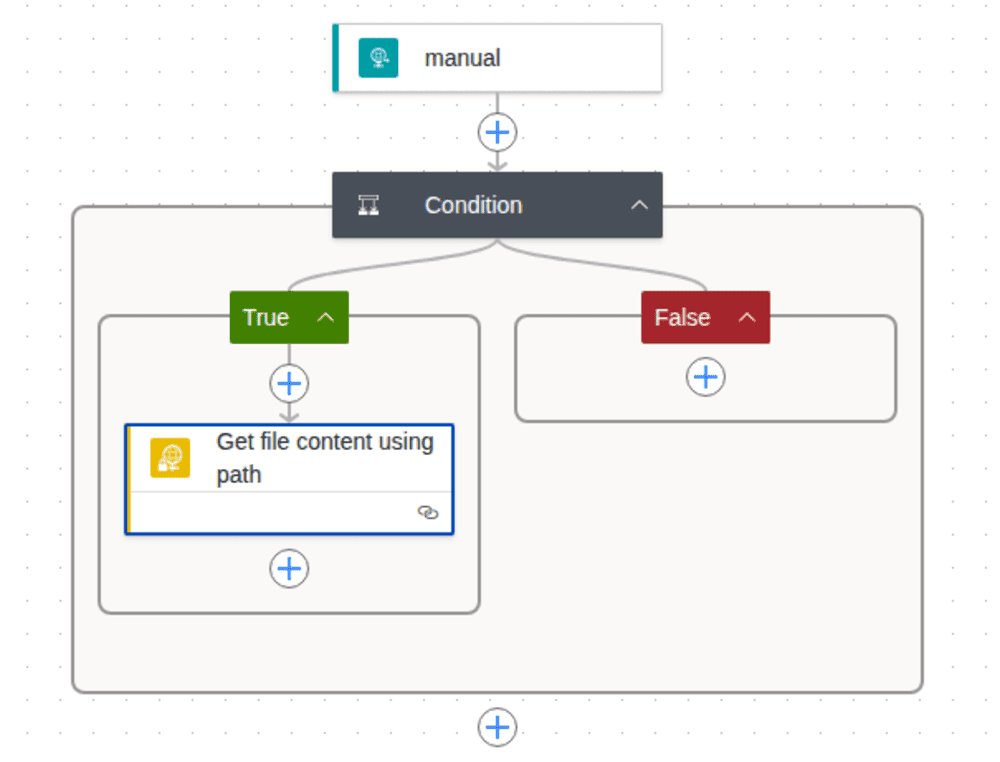
Inside the True branch, add the SFTP-SSH action that reads the file identified by the webhook.
- Add an
SFTP-SSHaction to the condition.
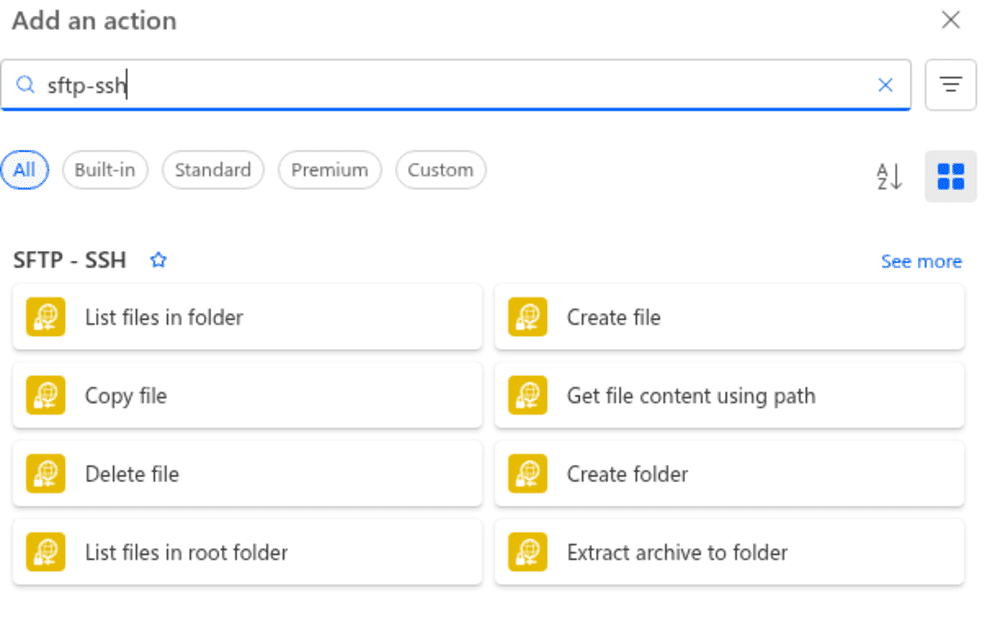
- Select
Get file content using path. - Use the file path from the webhook’s
Data.Pathvalue.
This walkthrough uses the SFTP To Go root credentials for the SFTP-SSH connection, so Power Automate can access the full storage path returned by the webhook. If you use credentials with a restricted home directory instead, the file path may need to be adjusted to start from that credential’s home directory.
Step 5: Create the SFTP file in SharePoint
Still inside the True branch, add the SharePoint action that’ll write the retrieved file into the chosen document-library folder.
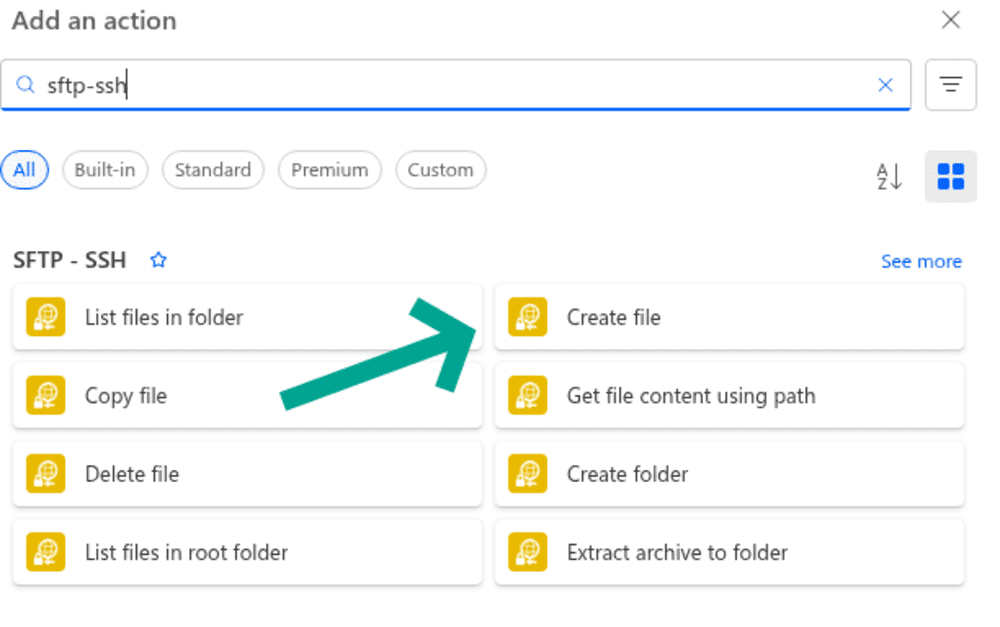
- Click the plus button below the condition block.
- Add the SharePoint
Create fileaction.
- In
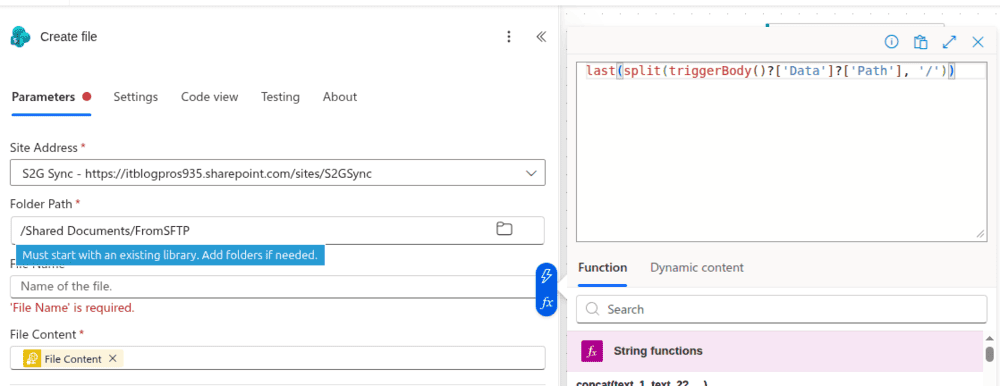
Site Address, select the SharePoint site. In the tested example, this isS2G Sync. - In
Folder Path, select the destination folder. In the tested example, this is/Shared Documents/FromSFTP.
Use the folder picker when possible. A manually typed path can resolve to the library root instead of the intended FromSFTP folder.
- In
File Name, use this expression to pull only the file name from the SFTP To Go path:
last(split(triggerBody()?['Data']?['Path'], '/'))
- In
File Content, select theFile contentoutput from the previousGet file contentstep. - Select
Save.
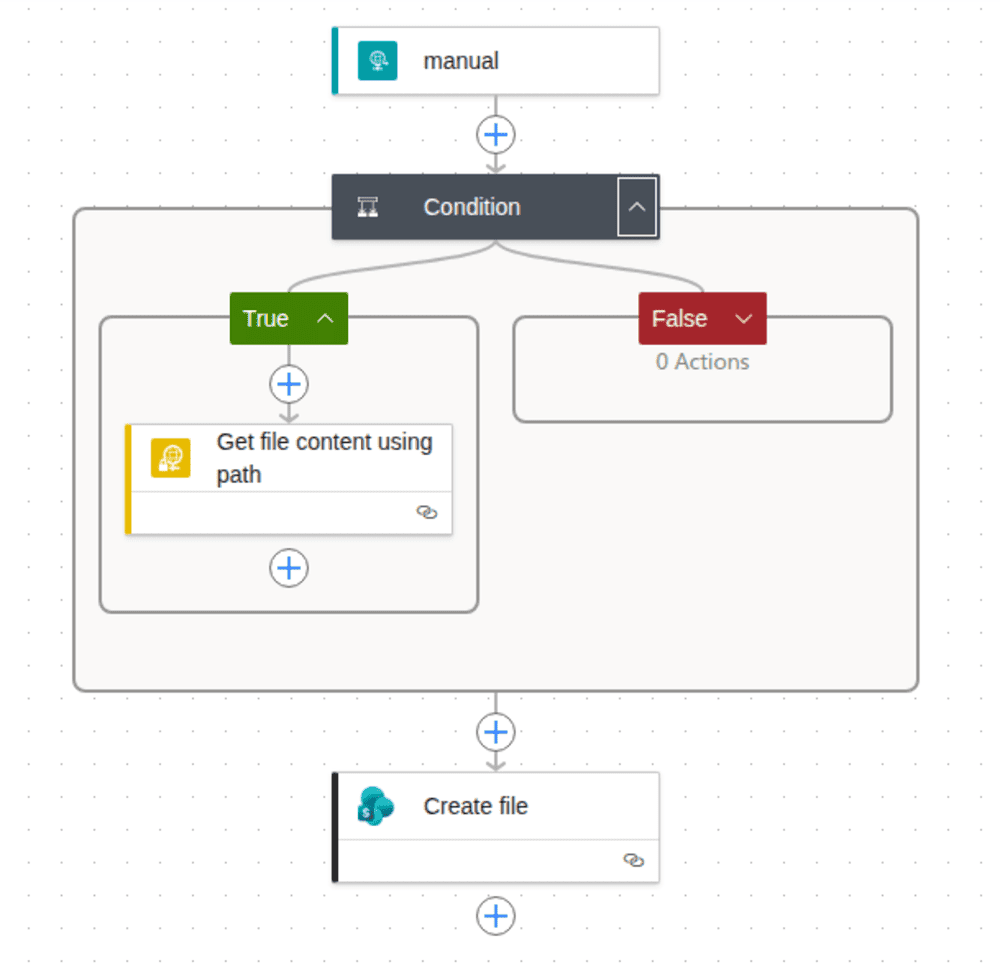
The file-name expression extracts the final segment of Data.Path; File content supplies the binary body returned by SFTP-SSH; and SharePoint Create file combines them in /Shared Documents/FromSFTP. The completed flow now looks like this:
Verify and troubleshoot SFTP to SharePoint sync
Step 6: Verify multiple SFTP uploads in SharePoint
Before testing the flow:
Before using the workflow with real files, decide what should happen if SharePoint already contains a file with the same name. Depending on your requirements, you may choose to fail and alert, overwrite the existing file, rename the incoming file, skip it, or send it to a review folder.
For a controlled inbound workflow, failing and alerting is usually safer than creating silent duplicates.
Then, after one file transfers successfully, add several files within the same short period, using the largest realistic file count and sizes expected in normal use. This checks whether Power Automate starts a separate successful run for every file without missing, delaying, or duplicating transfers.
- Upload two or more files at once to the SFTP To Go
/inboundfolder.
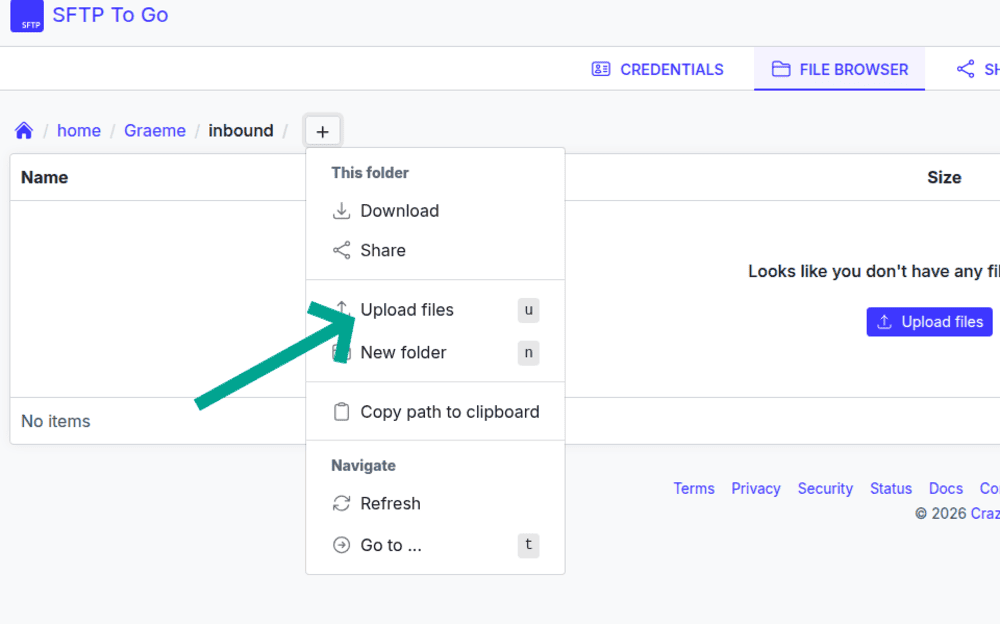
The tested walkthrough used three PDF files to confirm that separate uploads created separate runs. Use the file sizes and arrival pattern your own process expects.
- Upload the files to SFTP To Go.
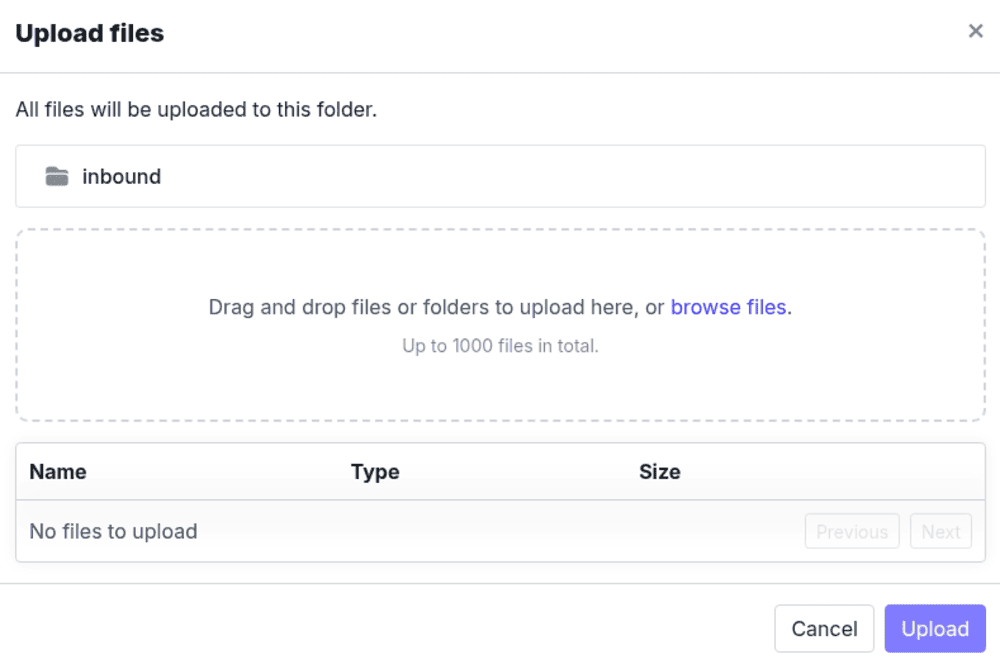
- Wait for the uploads to complete.
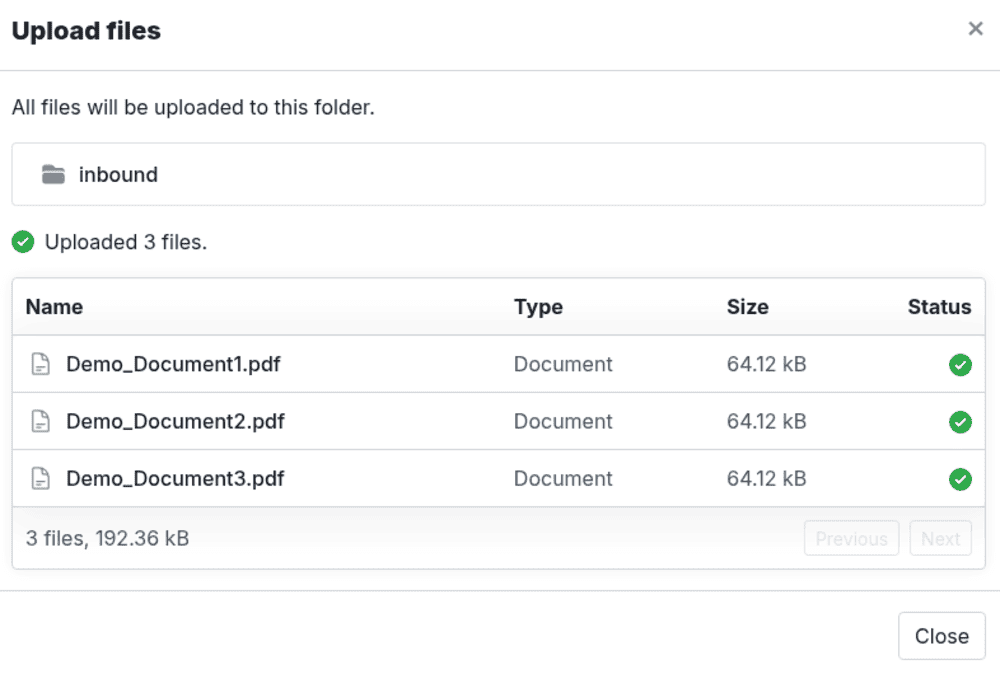
Each completed upload should trigger its own Power Automate run. Open the run history and check that the number of successful runs matches the number of files sent to /inbound.
- Open this flow’s
Run history.
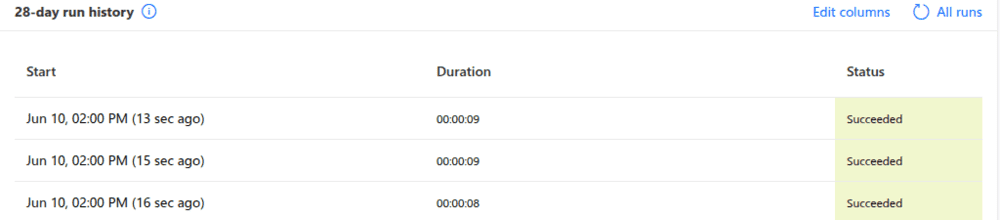
- Confirm that there is a separate run for each uploaded file.
- Confirm that all runs
Succeeded. - Open the SharePoint
FromSFTPfolder.
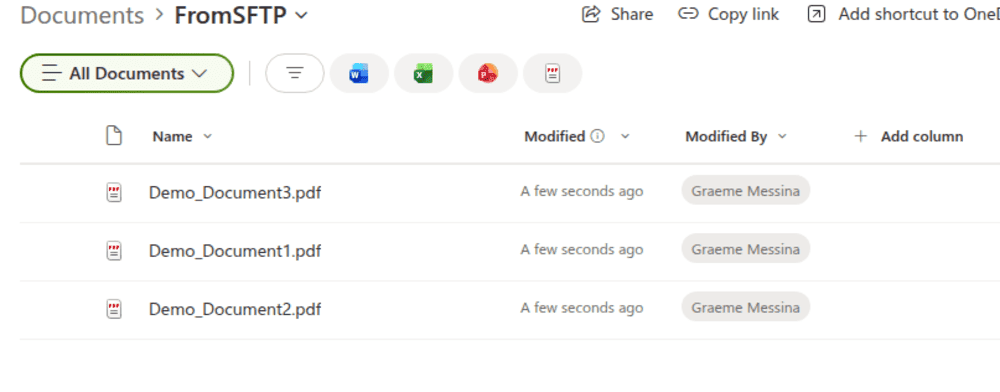
- Confirm that all three files are present.
When every upload has its own successful run and every file appears in FromSFTP with the correct name and content, the inbound flow is working as intended.
Troubleshoot SFTP to SharePoint webhook and path errors
An SFTP upload does not start the flow
- Confirm that the file reached the folder covered by the webhook and that the webhook is active. Then compare the endpoint stored in SFTP To Go with the current
HTTP URLshown in Power Automate. - If an older flow suddenly stops receiving requests, compare the stored endpoint with the current
HTTP URL. Microsoft has changed older HTTP-trigger URLs, so recopy the endpoint when needed and check Microsoft’s trigger troubleshooting guidance.
The event arrives, but Power Automate cannot retrieve the file
- Open the webhook payload and compare
Data.Pathwith the path passed intoGet file content using path. - Because the
SFTP-SSHconnection starts at the credential’s home directory, remove that repeated home prefix from the webhook path with the testedreplaceexpression.
The SFTP action returns 404 path does not exist
- Check the SFTP To Go credential’s home directory and the path passed to `Get file content using path`. Power Automate shows that home directory as `/`.
- Update the expression so the action receives the file path from the credential’s home directory, without repeating the home-directory prefix.
Power Automate shows List not found or GetTable
- This usually means the flow uses SharePoint
Create item, which expects a list, instead ofCreate file, which writes a document. - Replace it with SharePoint
Create file, then set the folder, file name, and file content again.
SharePoint creates the file in the wrong location
- Re-select the destination with the SharePoint folder picker and confirm that the path begins with the intended document library.
- A path typed by hand can resolve to the library root even when the flow succeeds.
The SharePoint connection needs attention
- Open Power Automate
Connections, re-authenticate the SharePoint connection, and complete MFA if the tenant requires it. - Check the failed action for token, permission, or
interaction_requiredmessages. - After the connection is healthy, resubmit a failed run or upload a new test file.
SharePoint already contains the same file name
- Apply the policy chosen during setup: fail and alert, overwrite, add a timestamp, skip the file, or route it to a review folder.
- Don’t leave this behavior undefined, especially when partners may resend files.
SFTP to SharePoint file-size and concurrency limits
In the tests behind this guide, files up to about 80MB moved successfully through the inbound Power Automate flow. That isn’t an SFTP To Go storage limit, and the reliable maximum can vary by Microsoft tenant, connector limits, and the number of uploads arriving at once. See Power Automate limits for current platform guidance.
The main points to test are the largest file your process expects and how many files may arrive within the same short period.
Inbound reliability can be affected by:
- the time required to retrieve and pass file content between connectors
- content-encoding overhead and action timeouts
- SharePoint library, tenant, and permission limits
- `SFTP-SSH` connector path handling and action limits
- parallel Power Automate runs when several files arrive together
- retry behavior and the risk of creating duplicate files
- unsupported filename characters, long paths, and deep folder structures
- the response time of the source and destination services
Before production use, test the exact webhook filter, source path, credential home directory, SharePoint folder, permissions, duplicate policy, realistic file count, and failure-notification process.
Test the largest files and the busiest arrival period the flow is likely to handle. One successful small-file transfer doesn’t show how the flow will behave under normal load.
For the wider control model around this inbound workflow, explore Managed File Transfer: MFT Software, SOC 2, GDPR, DORA, HIPAA, What Is MFT? and Enterprise Managed File Transfer: Benefits & Best Practices.
SFTP to SharePoint sync is now set up
You’ve now built and tested the SFTP-to-SharePoint flow. A file.created webhook starts each run, Power Automate reads the uploaded path and retrieves the file, and SharePoint creates it in the selected document-library folder.
After checking the paths, permissions, duplicate behavior, expected file sizes, and simultaneous uploads, the flow is ready to bring incoming SFTP files into SharePoint. For details on the shared SFTP-SSH connection, see How to Connect Power Automate to SFTP. If you also need to send SharePoint files to SFTP To Go, continue to SharePoint to SFTP Sync.
Frequently asked questions
Which SFTP To Go webhook event should trigger the SharePoint flow?
Use the `file.created` topic. It covers a new file or directory creation event, so pair it with a file-only path filter such as `Path matches ^.*[^/]$`. That keeps download, delete, ping, and directory events away from the SharePoint file-creation action.
Why does the Power Automate HTTP URL appear only after I save the flow?
Power Automate doesn’t generate the Request trigger endpoint until the first save. Save the flow once, reopen the trigger if needed, and copy the complete `HTTP URL` into the SFTP To Go webhook endpoint field.
Why does the HTTP trigger need a JSON request schema?
The schema tells Power Automate how to expose fields from the SFTP To Go webhook payload, including `Topic` and `Data.Path`. Generate it from a real test delivery so your later conditions and expressions use the payload structure the webhook actually sends.
How do I pass the SFTP To Go webhook path to the SFTP-SSH connector?
Compare `Data.Path` with the home directory used by the `SFTP-SSH` connection. If the webhook path includes that home directory, remove the repeated prefix with a `replace` expression before passing the path to `Get file content using path`.
Why does Get file content using path return a 404 error?
The action is usually looking in the wrong path. Check the credential’s home directory, inspect the full webhook path, and make sure the expression removes only the home-directory prefix that Power Automate already treats as `/`.
How do I make sure only files from the inbound folder reach SharePoint?
Add a condition that checks whether `Data.Path` contains the selected folder, such as `/inbound`. Continue the SFTP and SharePoint actions only in the `True` branch, and ignore or log the `False` branch.
How can the flow keep the original SFTP file name in SharePoint?
Use `last(split(triggerBody()?['Data']?['Path'], '/'))` in the SharePoint `File Name` field. It extracts the final path segment while the previous SFTP action supplies the binary file content.
What should the flow do when SharePoint already has the same file name?
Choose the behavior before production use: fail and alert, overwrite, append a timestamp, skip the file, or send it to a review folder. For a controlled workflow, failing and alerting is often safer than creating silent duplicates.